Use NAT Networking for Multiple IP Addresses
Hello there GDM fans my name is Angus and today I will be talking about a script I have made for port range forwarding. If you don’t already know about setting up NAT and port forwarding via Routing and Remote Access tool then you should check out Cary’s blog that is called, “Build Hyper-V nested VM with multiple public IP addresses at Azure” and you can come back to this blog so you can understand this subject clearer than if you didn’t check out Cary’s blog. You should think that it is now easy to make multiple forwarding, but it is a lot harder to use port range forwarding instead. Let’s get started with this tutorial!
- Go inside of the Routing and Remote Access tool by clicking on the Windows button, go down to the Windows Administrative Folder and click on the program.

2. Now that you are in, you should right-click your Ethernet port and go into properties<Services and Ports
(your Ethernet Network’s name is found by going into Control Panel>Network and Internet>Network Connections


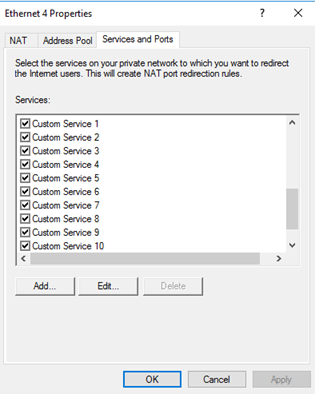
As you can see, there are no custom ports but that is going to change soon. You can now press on OK
3. Now you can go into PowerShell ISE and create a new script


Now, you can paste this script in
$Port=1000
$HostInterfaceName="Ethernet 4"
$Protocol="TCP"
$PublicIP="10.10.1.101"
$PrivateIP="192.168.100.101"
for ($Port=1000; $Port -le 1010; $Port++)
{netsh routing ip nat add portmapping name=$HostInterfaceName proto=$Protocol publicip=$PublicIP publicport=$Port privateip=$PrivateIP privateport=$Port
}
Basically, the port starts at 100 and the HostInterFace name which is the name of your Ethernet Network. The Protocol was TCP, the public IP was 10.10.1.101 and the PrivateIP was 192.168.100.101.
for ($Port=1000; $Port -le 1010; $Port++)
{netsh routing ip nat add portmapping name=$HostInterfaceName proto=$Protocol publicip=$PublicIP publicport=$Port privateip=$PrivateIP privateport=$Port
}
This is the repeatable command which makes the whole script work. All the other things above are just to shorten the statements for them. Basically, this command helps you vary the ports for example if you set the ($port=1001 then it will start at 1001, all you have to do is change the value and you can customize it by yourself! If you want it to end at a certain number, then at the part where it says $Port -le 1010; $Port++) you have to change the 1010 to a certain number that is above the first number.
Let’s run the script and see what happens. Once you are done running the script you can check either using the Routing and Remote tool and right click the Ethernet and go into properties and click on the Services and Ports tab. If you don’t see any additions, you should first refresh your Ethernet Network and it should be good to go! This is what it would look like if it had worked.

You could have more or less custom services depending on what the variables of your ports are. You can also check your ports by clicking on the PowerShell prompt and type in
netsh routing dump
This will let you see the services more faster in a slightly more detailed and fast manner as you can see in the picture below.

Just type in the command, scroll up a little bit and you will find this!
Overall, this is just a fast and easy way to use port range forwarding for even over 1000 configurations! It just takes less time and more efficient for your needs.
I hope you all enjoyed this tutorial and I will be seeing you inside of the next blog!
Twitter: @FrostedFright
Author: Angus Sun
Angus is excited to learn as much as he can about Microsoft and
other technologies. The one thing he likes is computer programming and technical writing. He also likes playing video games whenever he has spare time. Other than that, he just spends time writing blogs and creating videos.
